Showing posts with label Jules Yakapovich. Show all posts

Friday, June 12, 2020

Radar Defense Part 6

Here are some film clips of Coach Yakapovich's 1969 Kenmore West team running the radar defense.


The clip appears to be Defense 1. I was surprised by the tilt of the on the LOS defenders. The book shows the players drawn as tilted but to see the technique on film was still a surprise at the angle of the outside tilt.


In the clip the F3 (#52) appears to have his eyes inside. The OT is pulling outside with the TE blocking down. My initial reaction was #52 should be playing lateral outside crossing the face of the TE's down block. Inside he takes the inside space on the pull to make the TFL. Not sure if this is just the F3 making a play with the open space or a called stunt.

Outside flow runs was an area I was curious after drawing up plays on paper. Could the offense get quickly to the edge with so many defenders near the LOS in gaps?


One of the selling points of the defense in the book is how naturally and quickly players are able to pursue. This clip shows it off, the defender's technique puts players quickly into pursuit. The defense does a good job of forcing the ball outside using a spilling type fit. The Corner and Safety clean it up once it gets outside the 4 man.


Here is a short yardage example of Defense 4. The LOS players use the 3/4 point stances and attack with penetration. The Safety and Corners are in cheated down alignments.


Here the 2 men are in a tilted penetrating technique. The F1 does a good job getting across the blocks to be in position before missing the tackle.


Nice example of F3 (#33) crossing the down block of the TE. The double team of the OT and TE ends up with both blockers falling over one another and on the ground. B1 is attacking the mesh point quickly from the backside A gap. Defenders quickly disrupting the mesh point is a proven recipe to cause mesh point ball security issues, here a forced fumble.


Here is a good example of the overlap in pursuit. The F1 (#45) is able to overlap the F2 (#52).  When F2 gets caught by the down block F1 is able to get playing lateral and get involved in the off-tackle play.


Another adjusted call against the offense in a backed up field position. The tilted 2 men really create problems when penetrating. This is one of the challenges of the Radar concept. Are the players read/react or attack/penetrate? Here the tilted B2 is unblocked for a TFL.


Nice example against a drop back pass. This looks like the Sprint stunt with the penetrating 2's and a 1 wrapping over the top to create pressure.


This is one of the concepts that on paper looks like a concern. With lighter stand up players, the offense electing to get low pad level and run wedge dive concepts. Fire off the ball and attempt to knock the stand up defenders off the ball.


This looks like a Defense 3 example with the 4's activated as edge rushers. The defense does a good job of spilling the ball lateral to the unblocked corner.

Really interesting to see the film of the defense from 1969. Huge shoutout to Sean Bruso for making me aware of the film. Coach Bruso coaches in western NY state and shared a link to the YouTube video of Kenmore West that was digitized from 16mm film reels. If you are interested in the full film here is the link.


Tuesday, June 9, 2020

Radar Defense Part 5

In the 5th installment of the radar defense series the focus will turn to usage and adjustments. 

Why use Defense 1,2,3,4,13,.etc ? What are the strengths and weaknesses of each?

Defense 1

Strength: Best basic defense. Good vs. run and pass
Weakness: No quick pass rush
Use: Anytime except when a quick pass rush is needed
Defense 2

Strength: Good basic defense. Good vs. run and pass
Weakness: No quick pass rush
Use: Having the 2 man off the ball is good when the offense is trying to trap that player making the trap block much more difficult. Also the 2 being off the ball helps the 2 man play quickly in pursuit overlapping on off tackle runs.


Defense 3

Strength: Add predetermined rush from the 4 man, good interior run pursuit
Use: When and interior run defense and a edge pass rush is needed with adequate flat coverage


Defense 4

Strength: Aggressive interior gaps plugged
Weakness: Off tackle runs and pass coverage
Use: Short yardage and goal line run situations.

Defense 13

Strength: Good all around with run and edge pass rush
Use: Good all around defense

The result by changing up the edge pass rush as well as messing with who is on the LOS/off the LOS helps affects the offense's ability to attack each area. Each basic and combination defense presents different strength/weakness areas. The overlap of each makes for a total defensive package.

To disguise the defense would show a basic Defense 1 look and stem during the cadence into one of the other looks. The call "show" puts the defense into a Defense 1 look and during the cadence the players move to the call. Example Show 2 = the defense aligns in Defense 1 during the cadence the players move to Defense 2. This would only affect the 1's and 2's. This type of stemming helps hide the called defense's strengths while helping mitigate weaknesses of specific calls.

Adjustments:
The defense was also able to tag on adjustments to defensive calls to help add more versatility.

Crash


The Crash call only affects the 1's and 2's, all others play their normal techniques based on call. The Crash call is hard penetration in the interior gaps. This is a nice compliment to the read/react lateral base radar technique. 

Hold up the Ends


The 3 men stem during the cadence to head up on the TE or can be called to line up in the head up technique. All others play their normal technique. The 3 man beats up and impedes the release of the TE into a pass route. The 3 man will be late to enter the pass rush in this technique.

Knife


The 3 men stem during the cadence to an outside alignment on the TE or can be called to line up in edge alignment. All others play their normal technique. The 3 man can be a quick pass rusher and set the edge on the run. This call is used in other concepts and also could have modern applications especially with no TE present.

Sprint


Sprint is a flow based snap pressure. The 2's no longer read the OT, they penetrate the B Gap. The 1's react to the backfield flow. The flow side 1 immediately overlaps and pressures over the top of the penetrating 2. The 1 opposite the flow plays normal lateral technique pressing open seams. Sprint can also be run with a knife call.

Double Sprint


Double sprint is like sprint on the changing the responsibility of the the 1 opposite the flow. On flow away the B1 will pressure the midline are to create a quick run through. Double sprint can also be run with a knife call.

The different calls and adjustments show the radar defense is a total defensive package with the ability to handle various offensive threats. Next up a look as some film clips of the radar defense in action. 

Saturday, June 6, 2020

Radar Defense Part 4

For this article in the radar defense series the focus is run fits. These fits are all examples from the book and are diagrammed against Defense 1.


For these run fits the discussion will use terms from the book like F2 or B2. The F's are the front side or play side defenders while the B's are back side defenders.

Over the Center:


Fold Scheme

F1: Fill ready to play fold or crossblock
F2: Fan/Fan - Eyes inside when OT fans, cross the Fan of OG
F3: Fan/Fan - Eyes inside when TE fans, cross the Fan of OT
F4: Force
B1: Down by Center, cross the block
B2: Cutoff - Play lateral keep leverage on OT
B3: Cutoff - Play lateral keep leverage on TE
B4: Cutback

Trap Scheme

F1: Fill ready to play trap block
F2: Fan/Fan - Eyes inside when OT fans, cross the Fan of OG
F3: Fan/Fan - Eyes inside when TE fans, cross the Fan of OT
F4: Force
B1: Down by Center, cross the block
B2: Pull by OT, cross the back block by the OG
B3: Cutoff - Play lateral keep leverage on TE
B4: Cutback

Over the Guard:

Fold Scheme


F1: Down by the OG, cross the block
F2: Fan/Fold - Eyes inside when OT fans, ready to play fold block
F3: Fan/Fan - Eyes inside when TE fans, cross the Fan of OT
F4: Force
B1: Cutoff - Play lateral keep leverage on OG
B2: Cutoff - Play lateral keep leverage on OT
B3: Cutoff - Play lateral keep leverage on TE
B4: Cutback

Trap Scheme


F1: Down by the OG, cross the block
F2: Fan/Trap - Eyes inside when OT fans, ready to play trap block
F3: Fan/Fan - Eyes inside when TE fans, cross the Fan of OT
F4: Force
B1: Down by the OG, cross the block
B2: Cutoff - Play lateral keep leverage on OT
B3: Cutoff - Play lateral keep leverage on TE
B4: Cutback

Over the Tackle:

Fold Scheme


F1: Cutoff - Play lateral keep leverage on Center
F2: Down - Cross the block
F3: Fan/Fold - Eyes inside when TE fans, ready to play fold block
F4: Force
B1: Cutoff - Play lateral keep leverage on OT
B2: Cutoff - Play lateral keep leverage on OT
B3: Cutoff - Play lateral keep leverage on TE
B4: Cutback

Trap Scheme


F1: Down by OG, Cross the block
F2: Down - Cross the block
F3: Fan/Trap - Eyes inside when TE fans, ready to play trap block
F4: Force
B1: Down by Center, Cross the block
B2: Cutoff - Play lateral keep leverage on OT
B3: Cutoff - Play lateral keep leverage on TE
B4: Cutback

Over the End:


Fold Scheme

F1: Cutoff - Play lateral keep leverage on Center
F2: Pull/Cutoff - Play lateral keep leverage on OG
F3: Down - Cross the block
F4: Force
B1: Cutoff - Play lateral keep leverage on OG
B2: Cutoff - Play lateral keep leverage on OT
B3: Cutoff - Play lateral keep leverage on TE
B4: Cutback

G Scheme


F1: Cutoff - Play lateral keep leverage on Center
F2: Down - Cross the block
F3: Down - Cross the block
F4: Force
B1: Cutoff - Play lateral keep leverage on OG
B2: Cutoff - Play lateral keep leverage on OT
B3: Cutoff - Play lateral keep leverage on TE
B4: Cutback


With a Block by the Back:

Zone 

F1: Cutoff - Play lateral keep leverage on Center
F2: Cutoff - Play lateral keep leverage on OG
F3: Down - Cross the block
F4: Force
B1: Cutoff - Play lateral keep leverage on OG
B2: Cutoff - Play lateral keep leverage on OT
B3: Cutoff - Play lateral keep leverage on TE
B4: Cutback

Power


F1: Down by OG - Cross the block
F2: Down - Cross the block
F3: Down - Cross the block
F4: Force
B1: Down by Center - Cross the block
B2: Cutoff - Play lateral keep leverage on OT
B3: Cutoff - Play lateral keep leverage on TE
B4: Cutback

Around the End:

Onside Guard Pull


F1: Cutoff - Play lateral keep leverage on Center
F2: Down - Cross the block
F3: Down - Cross the block
F4: Force
B1: Cutoff - Play lateral keep leverage on OG
B2: Cutoff - Play lateral keep leverage on OT
B3: Cutoff - Play lateral keep leverage on TE
B4: Cutback


Offside Guard Pull 

F1: Down by OG - Cross the block
F2: Down - Cross the block
F3: Down - Cross the block
F4: Force
B1: Down by Center - Cross the block
B2: Cutoff - Play lateral keep leverage on OT
B3: Cutoff - Play lateral keep leverage on TE
B4: Cutback

Overall the fits are easy to understand when you follow the block reaction rules for the ON the LOS and OFF the LOS defenders laid out in the book. The front structure makes it difficult to get a double team effectively turning every scheme into a series of 1 on 1's. The main takeaways I had from looking at these fits is the critical nature of making a quick read of the block for the defender as well as the ability of the defender to cross down blocks or leverage cutoff blocks. Additionally many of the schemes quickly become "same as" for the defenders. While their reads and reactions are critical is seems likely they will be getting many reps of doing those limited number of reads and reactions. Repetition breeds mastery.

I could see how this type of lateral read and react style of defense could cause headaches for blocking schemes. The defenders don't try to go toe to toe and win with physical dominance. They are small quick stand up players who read and go where the blocking scheme doesn't want them to be. Combine lateral techniques with the alignments making double teams unlikely and the result is limited movement by the OL blocking at the point of attack. It also seems likely this scheme could marry nicely with some more aggressive calls that do have attacking penetrating defenders. In that case the blocking would have two very drastically different styles being threatened by the defense. The resulting challenge is the offense being forced to react post-snap if it is a read/react defense or attack/penetrate defense. It is always good to turn the supposed initiators (offense) into reactors. 

In the next article the focus will be usage, when to use which defense including some strength and stress areas of each call outlined in the book as well as adjustments.

Thursday, June 4, 2020

Radar Defense Part 3

Part 3 of the series on radar defense will focus on the block reactions for the off the LOS defender. 


For these examples the 1 player in Defense 1 will be featured however the off the LOS technique can be played by the 1,2, or 3 player depending on call or multiple numbers in the combination calls. The 1 player in Defense 1 is keying both the Guard and Center.

Down:


If either the Center or Guard attempts to block the 1, the 1 player will block shed playing immediately across the block filling any open seam that shows while pursuing laterally.


Both the Center and Guard may be down blocking in the same direction, the reaction for the 1 player does not change.


Against a down and pull scheme the 1 player will react to the down and cross the down block. 

Cutoff/Reach:


If the Center and Guard attempt to go flat and lateral to cutoff/reach the 1 player, the 1 player will play lateral down the LOS maintaining on the block.


The 1 player's reaction is the same if the block is in combination with a pull by either the Center or Guard.

The 1 player must be able to identify he angles of the Center/Guard block. The Cutoff/Reach is flat and lateral while the Down blocks are at an angle and coming toward him.

Fill:


When the Center and Guard block opposite one another the gap is open and the 1 player will fill. The 1 player will position himself in the inside area of the gap at the LOS ready for the blocking threat.


On the fill read the 1 player may get at a fold or trap puller from the inside. 


The 1 player may also get the fold or wham block with a trapping puller coming from the outside. 


The 1 player may also get a lead/isolation block from a back. 


When the 1 player positions himself at the LOS on a fill read he must anticipate the blocks in the order they will arrive. The fold schemes with pullers from the inside or outside from adjacent OL will arrive first, next the longer trap blocks coming from puller aligned further away,and lastly the lead block of a back.

Pass Set:


The 1 player will drop into coverage when the Center/Guard pass set. It is possible the off the LOS player may have pass rush responsibility on the pass set.

Those are the reads for the off the LOS players. In the next article the on the LOS and off the LOS techniques will come together for run fits against a full offense run blocking scheme.

Wednesday, June 3, 2020

Radar Defense Part 2

In part 2 of the series on the radar defense the focus is on the block reactions for the on the LOS players.


For these examples the 2 player in Defense 1 will be featured however the LOS technique can be played by the 1,2, or 3 player depending on call. The 2 player in Defense 1 is keying the OT.

Down Block:


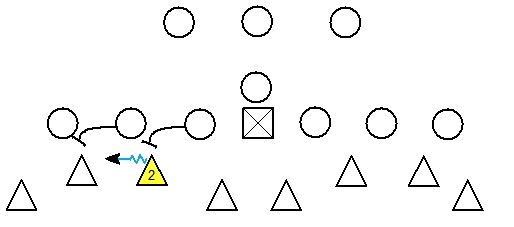
When the OT blocks down the 2 player will block shed playing immediately across the block filling any open seam that shows while pursuing laterally.


The reaction is the same against a down and pull scheme.


Additionally if the down block is part of a double the 2 player will turn the double team into a single block and play immediately outside the OT's down block. Double teams are very difficult against this defensive alignment with all defenders near the LOS and in every gap.

Fan:


When the OT key blocks at an angle outside the 2's eyes and footwork must go back inside. The 2 player must be ready for a number of outcomes when reacting back inside.


The 2 must be ready for a lead/isolation block from a RB. 


When the 2 reacts inside he must also be ready for a trap block. 


Against a trap scheme when the OT punches the 2 and releases the 2 will use the same eyes inside step inside reaction.


The 2 will be at a disadvantage against a fold or wham scheme with the trap block coming from the outside.


Against a fan/fan scheme the 2 will react inside when the OT fans. With the OG also fanning the 2 will block shed and play immediately laterally across the OG's block. This technique is the same as the reaction to the OT's down block only working inside instead of outside. 


The book doesn't specify being read at the 2 position when the OT fans in an option scheme. Based on the rest of the reactions I believe the 2 would play hard inside and tackle any dive threat.


Cutoff/Reach:


If the OT attempts to go flat and lateral to cut the 2 player off on play away, the 2 player will play lateral down the LOS maintaining inside leverage on the cutoff block.


When the OT is flat and lateral outside the 2 player must be flat and lateral to maintain leverage on the OG. The 2 player must be able to ID the angle difference in a Fan and Reach.

Pull:


When the OT pulls inside  (long pull or a fold) the 2 player reacts flat and lateral inside. The 2 will block shed and play across the block of an interior OL blocking back on him.


Against an outside pull the 2 will play outside. The outside movement should help the 2 player avoid a reach from the OG. The 2 can either get in the pullers hip pocket and chase behind the LOS or play laterally based on the body position he ends up in in relationship to the puller and LOS.

Pass Set:


When the OT pass sets the 2 will pass rush. It is possible in some defenses the LOS player may have a pass drop responsibility when the key pass sets.  

Those are the block reactions for the on the LOS player. The next article will feature the off the LOS player reads.