Interesting article by Barry Hoover about evaluating offensive efficiency in the red zone.
http://afcaweekly.com/2015/07/red-zone-average-a-better-way-to-measure-red-zone-effectiveness/
This type of statistical tool is good for self-scouting your offense or evaluating your defense against opposing teams. Coach Hoover is also the author of the Coach Hoover website.

Wednesday, July 29, 2015
Tuesday, July 28, 2015
2015 Seattle Seahawk Tackling Teach Tape
The previous post video has been blocked. Here is the same video directly from the Seahawks.
http://www.seahawks.com/video/2015/06/11/2015-seahawks-tackling
http://www.seahawks.com/video/2015/06/11/2015-seahawks-tackling
Monday, July 20, 2015
Attacking Quarters Coverage with a Zone Run/Post RPO
This concept is a Run Pass Option (RPO) play that combines outside zone blocking with a post route.

Here the concept is being run from 11 personnel and is attacking the weak side of a 4-2-5 quarters coverage defense. The OL and Y are blocking outside zone (stretch) with even numbers (6 vs 6).
The Defense has the advantage of being +1 as soon as the WS reads the TE is blocking and gets into a run fit. This concept is designed to read the weak safety. The QB will shuffle while meshing with the RB. The QB's vision is on the WS.

If the QB reads the WS coming downhill into the run game, the QB will pull back and throw the skinny post. The post is leaning his outside shoulder on the corner before breaking the route deep and skinny. The goal is for the WR to win the 1 on 1 against the corner who has no post help.

If the QB reads the WS not committing downhill to defend the run, the ball is handed off on the outside zone.
This type of run pass option is safe way to take a shot. The play has a chance to be a homerun post or an efficient run.
Sunday, July 19, 2015
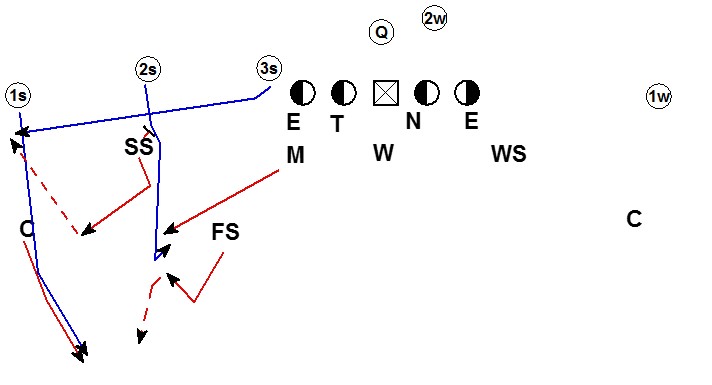
Another simple adjustable 4-2-5 Fire Zone Blitz
This post is a follow up to the previous post about an adjustable 4-2-5 fire zone blitz. This blitz can be easily adjusted to get the blitz where ever the defense wants to apply pressure. The concept could easily be used in a 4-3 defense as well.
SHOCK - SS or Corner Blitz
The SS or Corner will blitz based on where the tag sets the blitz. This blitz is only run on a hash.
Shock Strong
The blitz is going to the pass strength (higher number of receivers)

The Rush
FS sets the direction of the blitz with a Right/Left call. In the above example a "Left" call.
SS - To the call = edge blitz. This blitz can be either a contain or a spill by game plan.
Call DE - Long stick to A gap. Read the OG
Call DT - 2i Alignment, Long stick to opposite A gap. Read the Center.
Away DT - 2i Alignment, Slant to B gap.
Away DE - Contain
The Coverage
FS - Spin down to Seam is to the strength
WS - Rotate to Middle 1/3
Field Corner - Tight 1/3
Boundary Corner - Away from call = Tight 1/3
Mike - Always 3RH
Will - Always Seam
If the offense puts the formation into the boundary:

The Rush
FS sets the direction of the blitz with a right/left call. In the above example a "Right" call.
Boundary corner - To the call = edge blitz. This blitz can be either a contain or a spill by game plan.
Call DE - Long stick to A gap. Read the OG
Call DT - 2i Alignment, Long stick to opposite A gap. Read the Center.
Away DT - 2i Alignment, Slant to B gap.
Away DE - Contain
The Coverage
FS - Spin down to Seam is to the strength
WS - Tight 1/3
Field Corner- Tight 1/3
SS- Away from call = Seam
Mike - Always 3RH
Will - Always Seam
The blitz easily adjusts to 3x1 or 2x2 formations.
 Against 3x1 the Mike can bump to an alignment to drop off of the #3 receiver.

Against a 2x2 the Will can bump to handle the Seam drop on #2.
Shock Back
The blitz is going to an offset back. No offset back (pistol or under center = Strong)

FS makes a Left call to the back. SS is the blitzer and the Corner is in coverage.
 FS makes a Right call to the back. Corner is the blitzer and the SS is in coverage.
Shock Tite
The blitz is going to the TE. No TE = Strong


FS makes a Right call to the TE. Corner is the blitzer and the SS is in coverage.
Shock Motion
The blitz is going to the Motion. No Motion = Strong. This blitz is good vs. jet sweep and orbit motion teams.
 FS makes a Left call to the Motion. SS is the blitzer and the Corner is in coverage.
 FS makes a Right call to the motion. Corner is the blitzer and the SS is in coverage.
This type of blitz is simple for the defense but very multiple. By adding a new tag word the defense can change where the FS will make the right/left call and get the blitz anywhere the defense want to pressure.
SHOCK - SS or Corner Blitz
The SS or Corner will blitz based on where the tag sets the blitz. This blitz is only run on a hash.
Shock Strong
The blitz is going to the pass strength (higher number of receivers)

The Rush
FS sets the direction of the blitz with a Right/Left call. In the above example a "Left" call.
SS - To the call = edge blitz. This blitz can be either a contain or a spill by game plan.
Call DE - Long stick to A gap. Read the OG
Call DT - 2i Alignment, Long stick to opposite A gap. Read the Center.
Away DT - 2i Alignment, Slant to B gap.
Away DE - Contain
The Coverage
FS - Spin down to Seam is to the strength
WS - Rotate to Middle 1/3
Field Corner - Tight 1/3
Boundary Corner - Away from call = Tight 1/3
Mike - Always 3RH
Will - Always Seam
If the offense puts the formation into the boundary:

The Rush
FS sets the direction of the blitz with a right/left call. In the above example a "Right" call.
Boundary corner - To the call = edge blitz. This blitz can be either a contain or a spill by game plan.
Call DE - Long stick to A gap. Read the OG
Call DT - 2i Alignment, Long stick to opposite A gap. Read the Center.
Away DT - 2i Alignment, Slant to B gap.
Away DE - Contain
The Coverage
FS - Spin down to Seam is to the strength
WS - Tight 1/3
Field Corner- Tight 1/3
SS- Away from call = Seam
Mike - Always 3RH
Will - Always Seam
The blitz easily adjusts to 3x1 or 2x2 formations.


Against a 2x2 the Will can bump to handle the Seam drop on #2.
Shock Back
The blitz is going to an offset back. No offset back (pistol or under center = Strong)


Shock Tite
The blitz is going to the TE. No TE = Strong

FS makes a Left call to the TE. SS is the blitzer and the Corner is in coverage.

FS makes a Right call to the TE. Corner is the blitzer and the SS is in coverage.
Shock Motion
The blitz is going to the Motion. No Motion = Strong. This blitz is good vs. jet sweep and orbit motion teams.


This type of blitz is simple for the defense but very multiple. By adding a new tag word the defense can change where the FS will make the right/left call and get the blitz anywhere the defense want to pressure.
Saturday, July 11, 2015
4-2-5 Quarter Quarter Half Coverage vs. Trips Routes
This post is a follow up to the Quarter Quarter Half trips adjustment post. This post focuses on the 1/4 1/4 1/2 coverage vs. some common 3x1 strong side routes.
Quick Game

The Corner is reading the QB for quick game. Against a hard shoulder action to the flat the Corner will trigger to #1's quick game route. The SS has #2's quick game and the Mike has #3.

The Corner will handle the outside vertical, squeezing the route into the sideline. The SS will handle #2's quick game. The Mike will handle #3's quick game.

The Mike will handle #3 on the quick game. The SS has #2's quick game which is the sit route by #1 on the quick exchange by #1 and #2. The corner will trigger on the QB's hard shoulder to the flat. The goal is to force the long throw to the flat where the corner should make the play.
Drop Back Passes
 #3 is out so the Corner squeezes to #1 in his quarter. The FS is squeezes #2 in his quarter. The SS collisions #2 until he gets a "Push" call from the Mike. The SS pushes from Seam to Curl and breaks to the flat. The Mike expands looking for work. If #1's stays wide the SS covers both the curl and the flat route. If the curl works inside the Mike covers it.

#3 is out so the Corner squeezes to #1 in his quarter. The FS squeezes #2 in his quarter. The SS collisions #2 until he gets a "Push" call from the Mike. The SS pushes from Seam to Curl and breaks to the flat. The Mike expands looking for work, finding the inside curl. The SS must high low the curl to the flat.
 #3 is out so the Corner squeezes to #1 in his quarter and should expect NO help on the post. The FS squeezes #2 in his quarter. The SS collisions #2 until he gets a "Push" call from the Mike. The SS pushes from Seam to Curl and breaks to the flat. The Mike expands looking for work, finding the inside curl. The SS must high low the curl to the flat. If the FS sees the Mike is expanding to cover the curl the FS can man turn and undercut the post.

#3 is vertical so the Corner plays the deep outside 1/3. His vision snaps to the outside receivers to find vertical threats. When #1 breaks his route short the Corner should make a "China" call. The Corner covers #2 on the corner route. The FS plays the middle 1/3 and squeezes #3's vertical. The SS collisions #2 until he gets a "China" call from the Corner. The SS immediately expands to the flat on a China call. The Mike drops underneath and inside the #3 vertical, collision if possible.

#3 is out so the Corner squeezes to #1. With #1 releasing inside immediately the Corner will zone his quarter and cover #2's corner route. The FS squeezes #2 in his quarter and covers #2's corner route. The SS collisions #2 until he gets a "Push" call from the Mike. The SS pushes from Seam to Curl and breaks to the flat. The Mike will expand looking for work, finding the sit route by #1.
 #3 is vertical so the Corner plays the deep outside 1/3. His vision snaps to the outside receivers to find vertical threats. With no vertical threat the Corner zones his 1/3. The FS is playing the middle 1/3 and squeezes #3's vertical. The SS tops #2 playing in the window of the curl and breaking late to the flat. The Mike drops underneath and inside the #3 vertical, collision if possible.

#3 is vertical so the Corner plays the deep outside 1/3. His vision snaps to the outside receivers to find vertical threats. With 2 vertical threats the Corner midpoints the 2 verticals favoring the inside vertical. The FS plays the middle 1/3 and squeezes #3's vertical. The SS collisions #2 and gets depth in the seam with his head on a swivel. The SS expands to #1 if #1 converts his vertical to a comeback. The Mike drops underneath and inside the #3 vertical, collision if possible.

#3 is out so the Corner squeezes to #1 in his quarter and should expect NO help on the post. The FS squeezes #2 in his quarter and covers #2's out route. The SS collisions #2 until he gets a "Push" call from the Mike. The SS pushes from Seam to Curl and breaks to the flat. There is no curl but by pushing to the curl area the SS is underneath the out route by #2. The Mike will expand looking for work.
Screens

#3 is out so the Corner squeezes to #1 in his quarter. Once the corner snaps his eyes to #1 the #1 receiver is blocking. The corner will shed #1's block and secure the sideline. The FS squeezes #2. Once the FS snaps his eyes to #2 the #2 is blocking. The FS will run the alley inside the SS. The SS sheds #2's block and will force the bubble with outside in leverage. The Mike will expand inside out caging the ball with the SS.

#3 is out so the Corner squeezes to #1 in his quarter. Once the Corner snaps his eyes to #1 the #1 receiver is chopping his feet and selling a block. The Corner may react but by having his eyes on #1 allows him to collision and run with bubble & go. The FS squeezes #2. Once the FS snaps his eyes to #2 the #2 is chopping his feet and selling a block. The FS may react but by having his eyes on #2 allows him to collision and run with the bubble & go. Film study will help the Corner and FS identify the difference between bubble vs. bubble & go.

#3 is blocking so the Corner plays the deep outside 1/3. His vision snaps to the outside receivers to find vertical threats. With no vertical threats the Corner triggers to the screen and secures the sideline. The FS triggers and runs the alley inside the SS. The SS triggers straight up the field. If the SS gets any width he will get kicked out by the OL. By triggering straight upfield the SS either makes the tackle by beating the block of the OL or forces the ball to bounce over the top back inside to the rest of the defense. The Mike will expand inside out caging the ball with the SS.
 #3 is blocking so the Corner plays the deep outside 1/3. His vision snaps to the outside receivers to find vertical threats. Once the Corner snaps his eyes to the outside receivers where #2 is chopping his feet and selling a block. The Corner may react but by having his eyes on the outside receivers allows him to collision and run with screen & go. The FS may trigger on #3's "block" but by having his eyes on #3 allows him to collision and run with the screen & go. Film study will help the Corner and FS identify the difference between wide screen vs. screen & go.
Quick Game

The Corner is reading the QB for quick game. Against a hard shoulder action to the flat the Corner will trigger to #1's quick game route. The SS has #2's quick game and the Mike has #3.

The Corner will handle the outside vertical, squeezing the route into the sideline. The SS will handle #2's quick game. The Mike will handle #3's quick game.

The Mike will handle #3 on the quick game. The SS has #2's quick game which is the sit route by #1 on the quick exchange by #1 and #2. The corner will trigger on the QB's hard shoulder to the flat. The goal is to force the long throw to the flat where the corner should make the play.
Drop Back Passes


#3 is out so the Corner squeezes to #1 in his quarter. The FS squeezes #2 in his quarter. The SS collisions #2 until he gets a "Push" call from the Mike. The SS pushes from Seam to Curl and breaks to the flat. The Mike expands looking for work, finding the inside curl. The SS must high low the curl to the flat.

#3 is vertical so the Corner plays the deep outside 1/3. His vision snaps to the outside receivers to find vertical threats. When #1 breaks his route short the Corner should make a "China" call. The Corner covers #2 on the corner route. The FS plays the middle 1/3 and squeezes #3's vertical. The SS collisions #2 until he gets a "China" call from the Corner. The SS immediately expands to the flat on a China call. The Mike drops underneath and inside the #3 vertical, collision if possible.

#3 is out so the Corner squeezes to #1. With #1 releasing inside immediately the Corner will zone his quarter and cover #2's corner route. The FS squeezes #2 in his quarter and covers #2's corner route. The SS collisions #2 until he gets a "Push" call from the Mike. The SS pushes from Seam to Curl and breaks to the flat. The Mike will expand looking for work, finding the sit route by #1.


#3 is vertical so the Corner plays the deep outside 1/3. His vision snaps to the outside receivers to find vertical threats. With 2 vertical threats the Corner midpoints the 2 verticals favoring the inside vertical. The FS plays the middle 1/3 and squeezes #3's vertical. The SS collisions #2 and gets depth in the seam with his head on a swivel. The SS expands to #1 if #1 converts his vertical to a comeback. The Mike drops underneath and inside the #3 vertical, collision if possible.

#3 is out so the Corner squeezes to #1 in his quarter and should expect NO help on the post. The FS squeezes #2 in his quarter and covers #2's out route. The SS collisions #2 until he gets a "Push" call from the Mike. The SS pushes from Seam to Curl and breaks to the flat. There is no curl but by pushing to the curl area the SS is underneath the out route by #2. The Mike will expand looking for work.
Screens

#3 is out so the Corner squeezes to #1 in his quarter. Once the corner snaps his eyes to #1 the #1 receiver is blocking. The corner will shed #1's block and secure the sideline. The FS squeezes #2. Once the FS snaps his eyes to #2 the #2 is blocking. The FS will run the alley inside the SS. The SS sheds #2's block and will force the bubble with outside in leverage. The Mike will expand inside out caging the ball with the SS.

#3 is out so the Corner squeezes to #1 in his quarter. Once the Corner snaps his eyes to #1 the #1 receiver is chopping his feet and selling a block. The Corner may react but by having his eyes on #1 allows him to collision and run with bubble & go. The FS squeezes #2. Once the FS snaps his eyes to #2 the #2 is chopping his feet and selling a block. The FS may react but by having his eyes on #2 allows him to collision and run with the bubble & go. Film study will help the Corner and FS identify the difference between bubble vs. bubble & go.


Friday, July 10, 2015
Defending Trips with Quarter Quarter Half Coverage in the 4-2-5
This is the first post in a series about trips coverage adjustments. This is a 1/4 1/4 1/2 concept.

The Corner to the Trips is using Rattle technique. Rattle stands for Read Three. Corner is aligned 1x7 inside of #1 tilted. He is reading QB for quick game to #3.
The FS is also using Rattle technique (reading #3). The FS is aligned at 10-12 splitting the difference between #2 and #3. His initial footwork is a controlled pedal.
Rattle Technique
 If #3 releases outside the FS will squeeze his coverage to #2, while the corner will squeeze outside to #1.

If #3 releases inside or vertical the FS will work to the middle 1/3 and the corner will squeeze #2 in the seam playing the outside 1/3.
SCiF Technique
The SS is aligned at 5 yards outside shoulder of #2 with a square stance. On the snap the SS will pop his feet and read through the EMLOS to the QB. His drop is SCiF (Seam-Curl-Flat). The SS has quick game routes to #2.
Against drop back pass if the #2 releases vertical the SS will stay square and collision #2. After collision the SS will pedal to a depth of 12 in the seam (2 yards outside the hash).

While pedaling the SS will have his head on a swivel looking for the QB and receiving threats. If the QB tries to throw the ball on a line to #2 in the seam the SS should be able to make the play.
The SS will expand to the Curl and Flat if necessary.

If the #1 receiver is running a curl or in the SS should expand to cover him. The SS will only know to expand if he keeps his head on a swivel while pedalling. Also the Corner should give the SS an "IN" call.

If the #3 receiver is releasing outside the 3RH dropper (here the Mike) makes a "Push" call. The "Push" call pushes the SCiF dropping SS from Seam to #1's Curl and he should be ready to break to the Flat on the throw.

If #2 is inside immediately the SS will make an "Under" call and get depth in the seam.

If #2 is outside immediately the SS will top the flat route expanding from the Seam to the Curl and breaking on the throw to the flat.
3RH Technique
The Mike is a 3 Receiver Hook (3RH) dropper and drops in relationship to #3. The Mike has quick game routes to #3.

If #3 is out immediately the Mike pushes the SS and expands looking for a route to cover coming back inside.

If #3 is inside immediately the Mike walls #3. We rarely see #3 running a route deep enough to wall. Typically the #3 is running very shallow. If the #3 is under 5 yards the Mike calls "Under" and gets depth to 12 with his head on a swivel for new routes entering his zone. The Mike can pass the under because the Will is in the weak Hook-Curl and should be ready to break and tackle any throw to #3 on the under.

If #3 is vertical the Mike collisions #3 if possible and will work to a max depth of 12. If #3 is vertical there will be a middle 1/3 safety so the Mike does not need to carry #3 vertical down the field.
If #3 tries to work to the backside hash the Mike will wall him. The Will is in the weak Hook-Curl to force the ball over the top where the FS and the backside Corner should have a play on the ball.
Those are the strong side drops. The next post will focus on Rattle coverage vs. common 3x1 strong side route combinations.

The Corner to the Trips is using Rattle technique. Rattle stands for Read Three. Corner is aligned 1x7 inside of #1 tilted. He is reading QB for quick game to #3.
The FS is also using Rattle technique (reading #3). The FS is aligned at 10-12 splitting the difference between #2 and #3. His initial footwork is a controlled pedal.
Rattle Technique


If #3 releases inside or vertical the FS will work to the middle 1/3 and the corner will squeeze #2 in the seam playing the outside 1/3.
SCiF Technique
The SS is aligned at 5 yards outside shoulder of #2 with a square stance. On the snap the SS will pop his feet and read through the EMLOS to the QB. His drop is SCiF (Seam-Curl-Flat). The SS has quick game routes to #2.
Against drop back pass if the #2 releases vertical the SS will stay square and collision #2. After collision the SS will pedal to a depth of 12 in the seam (2 yards outside the hash).

While pedaling the SS will have his head on a swivel looking for the QB and receiving threats. If the QB tries to throw the ball on a line to #2 in the seam the SS should be able to make the play.
The SS will expand to the Curl and Flat if necessary.

If the #1 receiver is running a curl or in the SS should expand to cover him. The SS will only know to expand if he keeps his head on a swivel while pedalling. Also the Corner should give the SS an "IN" call.

If the #3 receiver is releasing outside the 3RH dropper (here the Mike) makes a "Push" call. The "Push" call pushes the SCiF dropping SS from Seam to #1's Curl and he should be ready to break to the Flat on the throw.

If #2 is inside immediately the SS will make an "Under" call and get depth in the seam.

If #2 is outside immediately the SS will top the flat route expanding from the Seam to the Curl and breaking on the throw to the flat.
3RH Technique
The Mike is a 3 Receiver Hook (3RH) dropper and drops in relationship to #3. The Mike has quick game routes to #3.

If #3 is out immediately the Mike pushes the SS and expands looking for a route to cover coming back inside.

If #3 is inside immediately the Mike walls #3. We rarely see #3 running a route deep enough to wall. Typically the #3 is running very shallow. If the #3 is under 5 yards the Mike calls "Under" and gets depth to 12 with his head on a swivel for new routes entering his zone. The Mike can pass the under because the Will is in the weak Hook-Curl and should be ready to break and tackle any throw to #3 on the under.

If #3 is vertical the Mike collisions #3 if possible and will work to a max depth of 12. If #3 is vertical there will be a middle 1/3 safety so the Mike does not need to carry #3 vertical down the field.
If #3 tries to work to the backside hash the Mike will wall him. The Will is in the weak Hook-Curl to force the ball over the top where the FS and the backside Corner should have a play on the ball.
Those are the strong side drops. The next post will focus on Rattle coverage vs. common 3x1 strong side route combinations.
Subscribe to:
Posts (Atom)