Found this teach tape I made back during the Covid break. Decided to share, so it is now available for free on CoachTube. Hopefully there is something in there you find helpful.

Thursday, June 20, 2024
Friday, December 16, 2022
Wristbands to make Play Calls
Here is a simple wristband organization and template. The goal is to make the wristband easy for the players to locate and read the calls while also being flexible enough to alter the play calling pattern. The flexibility of signaling in the call helps prevent issues if calls are repeated throughout the game, if the signalers are visible on game film that is exchanged to future opponents, or if a regular season opponent is played again in post-season play.

The setup is 9 sections with 5 calls per section allowing for 45 calls on the wristband. At the top of each section is a: City, Body Part, Color, and Number. If the play caller signals Atlanta 2 the players read the call located in the Atlanta 2 location. They will find "Over 4". If the call is Tampa 5 the players find "G Aim 3". Where the multiplicity comes into play is the 4 categories at the top of each section. Chicago 1 for example is "G Inside Magic". If the call is signaled Chest 1 instead the call is again "G Inside Magic". Gray 1 also = "G Inside Magic". Additionally the number in that section is 30. So if the call comes in 31 the call is again "G Inside Magic". There are 4 ways to signal in the same call. City #, Color #, Body Part #, or double digit ##. 53 is "Under 6" the next play could be signaled in as Hip 3 and the call is again "Under 6".
This allows the play caller to change up call to call within a series. Or more likely to tell players this series, quarter, half, or in this week's game we are live on Colors. However in the next series, quarter, half or game the calls may be live on Body Parts instead.
One hard and fast rule we used is the categories of calls don't move. 20/Boston/Belly/Black is always located in the top row and center column. This is like a watch.

When you look at a watch 12 o'clock is located top center, it doesn't vary. The location doesn't move so it is always easy for someone telling the time to locate 12, 3, 6 etc. The same is true for the player reading the wristband.
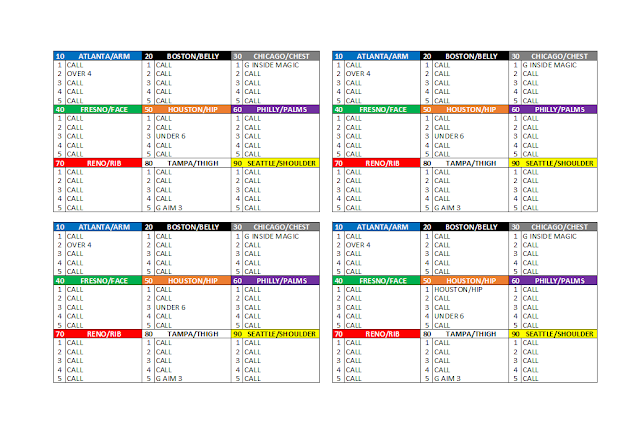
The template is set up with 4 wristband inserts on the page. The top left is where the calls are typed in to the wristband. The other 3 autofill with whatever is input in the top left calls. This insures the wristbands will match and avoid the dreaded non-matching wristbands situation.
If you want to download the template you can here.
Thursday, July 1, 2021
Fangio Read the Turn Pressure
Here is a simple Cover 1 dog from Vic Fangio's 2017-2018 Bears defenses with a rushing LB reading the turn of the protection. Bears are in Nickel personnel.

The Rush:
DE's are wide rushers. Front has a DT in a 3 technique to the side of the RB with a shade DT away. The LB opposite the RB is reading the OG's pass set. If the guard sets inside to the shade DT the LB pressures the B gap. If the guard sets out to the LB in the B gap the LB loops to the opposite A gap to find daylight in the rush.
The Coverage:
Cover 1 man free coverage with the LB to the RB in man coverage on the back.
First example is on 2nd&7

The guard sets out to the pressure LB, the LB wraps to the opposite A gap. The pass set for the Center is very difficult. The LB is able to win vs. the Center on the redirection set. The pressure also creates a 5 vs. 5 pass rush. The DE is able to win his 1 on 1 vs. the OT on the edge.
2nd example is a 1st&20 later in the game with the Bills in obvious pass mode.

3rd example is on 3rd&8

4th example on 3&8

5th example on 4&6

The pressure LB gets the Guard setting wide on the movement pass with the QB getting out of the pocket. The LB doesn't wrap inside and instead works for width to continue pressuring the QB as the launch point changes. Added bonus in coverage is the hover technique of the DB on the TE. When the TE blocks to help secure the edge for the QB sprint out, the DB hovers. Hover is staying over the top of the man responsibility with depth and vision on the man and the QB. This allows the hovering DB to break like a zone dropper would undercutting routes around him and providing help to man coverage defenders. The QB attempts to throw the ball on a lower trajectory with velocity to fit the ball in vs. man coverage. The man coverage throw allows the hover DB to vision and break getting his hands on the ball.
Good stuff as always from Vic Fangio. He has been coaching good defense for a long time. I'm excited to see his defense in Denver this season.
Thursday, June 17, 2021
Time Machine Article
Was looking on an old flash drive and found a scanned article from back in 1998. This article was one I read in high school that helped spark my interest in pressures and the concept of zone blitzing. Come for the throwback football article stay for the cowboy collar pictures and Jumpsoles ad.


Saturday, April 24, 2021
Limiting a Great Receiving threat in 12/21 Personnel
12/21 personnel groupings present a number of stresses to a defense. The obvious threat is run heavy structures using big personnel with a TE/FB creating extra gaps in the run fit. Heavier personnels often induce loaded boxes and 8 man front structures from a defense to handle the run game. Those loaded box defenses can also create single coverage for a star WR. This can lead to offenses using those heavy personnels/sets to attempt to isolate their best WR creating passing opportunities off max pro, play action, quick game, or RPO concepts. These personnel groupings also allow for a variety of 6,7,8 man pass protections. What is the solution in regular down & distance situations? How do we stop the run while controlling the star receiving threat? Here is a solution from the 3-4 spaced defense using quarters and halves coverage principles. Putting a cloud on the star WR can be a really inexpensive solution to mitigate some risk.
The coverage concept combines two coverages: Stuff and Roll. Stuff is a 1/4 1/4 1/2 concept while Roll is a double rotated Cover 2 concept.
The point is an activated OLB as the 4th rusher. The Mike will make a Rome/London call to activate an OLB. We are going to activate the OLB to the side of the star WR.
Vs. 21

Against a pro set if the star WR is to the defensive right the ILB will make a Rome call to set the point. The point OLB becomes part of the charge. The coverage will play Stuff coverage against a formation with the star WR as a single X. Stuff means half tool to the point and a quarter tool away from the point. Structurally this allows the defense to be sound numerically in the box vs. the run while putting a cover 2 concept on the star WR to disrupt passing concepts. Here the quarter Safety must trigger to become the 8th fitter in the box when the TE blocks.

When the star WR is strong the LB again will set the point to the star. Here London is the call with the star aligned to the defensive left. London activates the left OLB into the charge. The coverage will be Roll. The coverage shows as cover 3 rotated to the point with a Safety down and a Safety in the post. Showing a middle of the field closed look helps dissuade the offense from attacking the middle of field based on pre-snap coverage presentation. At the snap the post aligned safety rolls the coverage to a cover 2 concept strong with an inverted cover 2 concept weak. When the TE blocks the vertical hook down Safety become the 8th fitter for the run. Again this concept gives the defense an 8 man front spacing vs. the run with a cloud on the best WR.


Vs. 12


Against a 2x2 ace formation the point will gain be to the star. The coverage is stuff with a half tool to the point and quarter tool away. The quarter safety helps build the 8 man box while the cloud helps deny the star.


Against a 3x1 nub set the coverage is again Roll. The coverage rolls against any single width formation. The coverage denies the star outside or in the slot similarly to the previous twins example. The ILB does have the TE vertical to the strong side in a match so that's a matchup we are always mindful of in this concept.


With the star as the single X the coverage is Stuff. Half tool to the point with a quarter tool away. Here there are 3 receiving threats to the quarters side. That means the tool needed must be a quarter tool for 3 receivers. In this example the quarter tool is a mini 2 concept with the outside WR manned by the Corner. Inside the OLB/ILB/Safety are playing a 3 over 2 coverage on the 2 TEs. The Safety in the mini concept strong must trigger when the TE's block to add the 8th fitter in the run game.

Putting a cloud on a good WR in heavy personnel can be an inexpensive way to both be good vs. the run and deny the biggest receiving threat. Much of the coverage concept is built from coverage tools that most defenses already have in the their toolbox.
Thursday, March 4, 2021
Coaching the Rat in Cover 1
Here is a few coaching points we use for the rat in the hole when preparing the rat to cut crossers in Cover 1.
- The hole player does not need to drop quickly. By sitting low the hole player is in a good position to collect a low crosser. If there is no crosser the hole player will drop into the hole. The hole player will be under all intermediate crossers. There is NO rush to get to the hole drop.
- Keeping a head on a swivel is important to see the crosser. You cannot stare down the QB and see a crosser.
- Communication is key. If there is no “cut” call there is no cut. The hole player must tell the man defender he is taking over the route. Man defenders stay in man until the cut and collect by the hole dropper.
- Alerting man defenders where you are looking first is helpful for them to anticipate you will be cutting their man. An alert does not guarantee there will be a cut. The alert only tells the coverage players where the hole player will look to cut first. The call alerts the man coverage players and talks to his partner(s) in the funnel telling them where to look first.
Where to Alert?
We start with a camp rule.
Against 2x2 formation, look boundary first. Why? The low
crosser running from boundary to the field is the bigger threat to catch and run
going to all the open space. Also the boundary low crosser will get to the hole
player faster than the low crosser from the field due to reduced split into the
boundary.
Against 2x2 formation in the MOF, look to the side of the RB
release 1st. Why? Many teams release the RB to the side of the low
crosser.
Against 3x1 formation. Look strong first.
Against Empty look weak first.
Be aware of any reduced split by a receiver. Look to the
side of the reduced split first regardless of 2x2 or 3x1 or Empty.
Be aware motion can change the situation.
Game Planning the Cut
We will set the alert rules by game plan based on scouting
report. Those rules may adjust by down & distance, formation, defensive call, etc.
No Cut – One consideration is to have a no cut rule. The
hole player will drop to the hole and will not cut any low crossers. We use
this on longer down and distances. On 3rd & 12 we may be looking
to deny the intermediate crosser and force the ball low to break and
tackle the route short of the sticks. We can also set a “no cut” rule on a specific
receiver. In that case the hole player will not cut because we want to maintain
our pre-snap man match-up and avoid asking the hole player to take over that
receiver in coverage.
TE Only – Against some teams having the hole player cutting
a WR may not be a realistic matchup. In a TE only rule the hole player will
look to cut a Y on a crosser. If there is no crosser from the Y then drop to
the hole. The hole is not free to cut any WR on a crosser.
TE first – Tendency may dictate the alert goes to the TE
side. The hole player will look to cut a low crosser from the TE side first.
Then scan opposite.
Slot First – Tendency may dictate the alert goes to WR
aligned in the slot. The hole player will look to cut a low crosser from the
slot first. Then scan opposite.
Reduced Splits – Tendency may dictate the alert goes to WR
with a reduced split. The hole player will look to cut a low crosser from the
side of the reduced split first. Then scan opposite. This can include being
aware of bunch and stacked WR formations.
To a WR - Tendency may dictate the alert goes to a specific
WR. The hole player will look to cut a low crosser from the side of the
declared WR. Then scan opposite.
Flip Alignments - Which WR is on/off the ball may indicate where we want to alert by tipping where we should expect the low crosser.
Strong/Weak/Field/Bench - Tendency may dictate the alert
goes to the strong side or weak side of the formation or to the field or
boundary.
By RB location - The RB alignment in may tip route combos and dictate where we want to alert. The RB location in gun, his depth, a cheated wide alignment, RB and TE paired/split etc. may be indicators for the alert.
By formation – Specific formations may carry cut rules to
alert to a specific place. Those cut rules may be specific to that formation
only.
Short motion – Tendency may dictate a short motion rule.
Teams may want a reduced split and use late short motion to get the WR on the
run to a reduced split alignment. The man coverage player will alert the hole
of the short motion. This is the only alert that comes from a man player and
not hole player.
Alert side only - The hole player will cut to the side of the alert but will not scan and look to cut opposite, if there is no crosser from the alert side the hole player will work for depth to the hole. This allows the man coverage player opposite the side of the alert to play inside leverage man. This can make sense in some game plan situations.
Thursday, February 11, 2021
Adjusting the Run Fit in Fire Zone Pressure
Fire zone has run fits like all other defensive calls. Those fits can be adjusted to help prevent issues or account for stress areas.
Here is an example with a number of errors resulting is a good gain for our opponent.


We called this pressure to have the DL slanting to the boundary with the walked up OLB on a low track spill course and the ILB going from depth on a wide track. This is a variation of America's Fire Zone. When the OT blocked out on the OLB the Sam should have gone under the block. The expectation is the Sam will go inside/under blocks because the ILB will be pressuring on the wide track outside. That is one of many mistakes on the play, the Sam stay outside. We also have an "I'm IN" or "I'm OUT" call happening here from the Safety. In this example there is a split #2 resulting in the down Safety saying "I'm OUT" meaning the ILB has the wide track.
If the #2 was in a cut split or a TE the Safety would have a better angle for the wide track and would call "I'm IN" taking the wide track pressure pattern and job swapping his seam drop to the ILB.

This is a run pressure concept, the angles can be beneficial to alter who is in the pressure pattern based on the formation.
Why take on this type of complexity? Why not just let the Mike be the wide track the whole time? Don't make it harder than it needs to be.
On this call the #2 went in motion.

The Safety ends up on the edge of the box playing like we don't have any "I'm IN"/"I'm OUT" rules on.

Let's assume we did coach it with no "I'm IN"/"I'm OUT" rules in place. The Mike would pressure no matter what. The Safety needs to vise the lead block with the Will LB. The ask of the Safety here is very very big. The Safety cannot be too aggressive running into the box when he reacts to motion to avoid several problems:
1. Running into the off the LOS ILB wide track pressure from the Mike
2. Over running any potential run by the RB to the pressure side
3. Over running any potential route release from the RB or Y off
4. Over running any return motion from the #2
Just like in the actual clip the Safety ends up being too far from his work to fit the vise on the lead block and the run fit has issues.
If we had correctly handled the "I'm IN" call on this play.

Something like "I'm IN"/"I'm OUT" may seem like unnecessary complexity at first look. That added complexity got us on this play as we didn't coach it or execute it well enough. You can choose to use that as strikes 1, 2, and 3 for why you don't need something that might create confusion. However, when executed correctly it relieves a great deal of stress on the players.
What is another option if I don't like the "I'm IN"/"I'm OUT" concept but I'm worried about the stress on the Safety.
Another option is to set pressure Strong (To the Pass Strength) instead of to the wide field.

In the original example the pressure pattern adjusted with "I'm IN"/"I'm OUT" but stayed coming from the field. In this concept the pattern is declared to the defensive right because that is the pass strength. This version has no "I'm IN"/"I'm OUT" rules and will always be an OLB + ILB pressure pattern.
When motions happens the pressure is changed to the left.

The pass strength is now the left. The defense must now reset the pattern with a left declaration. The new pressure is well positioned vs. runs to the TE side. However, this does create stresses too. The LB's/Safeties have to communicate and adjust quickly to the motion. The DL must hear, understand, and execute the new left call in the pressure pattern. The rotation of the Safeties also creates stress to execute. Lastly, the adjustment also places some stress on the plays like split zone and counter going away from the motion.
These two options are both tools to have and rep to help take some stress off the players when motions happen in the fire zone run fits. The set it and forget method works in some contexts but if the offense begins to stress those hard called pressures that don't adjust there are only really three options:
1. Make no adjustment and ask the players to repeatedly execute difficult tasks, this includes the player over playing to achieve the difficult task and creating other potentially bigger issues
2. Allow the offense to chase you out of fire zone pressure calls
3. Have tools available and understood by the defense to be able to adjust.
It is easy to throw a cutup of good pressures on and say "see it works". Well what about when it goes wrong? What are mechanisms of failure? This post hopefully shows a failure we had in way that not only addresses how and why but also gets to the why behind adjustments we carry and coach. Having the tools available is the key to being a complete defense. It takes constant work and there will be failures. Those failures can fortify why we are doing what we are doing, to give players the best possible chance to succeed. Simplicity for simplicity's sake and unnecessary complexity both undermine the goal. A clip like this one isn't fun because we failed on the play however it is invaluable for helping players and coaches understand the why. Good luck as you build your tool box and master your tools.
Subscribe to:
Posts (Atom)